Google Search

Loading

Wednesday, July 14, 2010

Supported operating systems for the Auto Cad 2010

System Requirements

For 32-bit AutoCAD 2011

  • Microsoft® Windows® 7 Enterprise, Ultimate, Professional, or Home Premium (compare Windows 7 versions); Microsoft® Windows Vista® Enterprise, Business, Ultimate, or Home Premium (SP1 or later) (compare Windows Vista versions); or Microsoft® Windows® XP Professional or Home edition (SP2 or later)
  • For Windows Vista or Windows 7: Intel® Pentium® 4 or AMD Athlon® dual-core processor, 3.0 GHz or higher with SSE2 technology; for Windows XP: Intel Pentium 4 or AMD Athlon dual-core processor, 1.6 GHz or higher with SSE2 technology
  • 2 GB RAM
  • 1.8 GB free disk space for installation
  • 1,280 x 1,024 true color video display adapter 128 MB or greater, Microsoft® Direct3D®-capable workstation-class graphics card
  • 1,024 x 768 display resolution with true color
  • Microsoft® Internet Explorer® 7.0 or later 
  • Install from download or DVD

For 64-bit AutoCAD 2011

  • Microsoft Windows 7 Enterprise, Ultimate, Professional, or Home Premium (compare Windows 7 versions); Microsoft Windows Vista Enterprise, Business, or Ultimate (SP1 or later) (compare Windows Vista versions); or Microsoft Windows XP Professional (SP2 or later)
  • AMD Athlon 64 with SSE2 technology, AMD Opteron® processor with SSE2 technology, Intel® Xeon® processor with Intel EM64T support and SSE2 technology, or Intel Pentium 4 with Intel EM64T support and SSE2 technology
  • 2 GB RAM
  • 2 GB free space for installation
  • 1,280 x 1,024 true color video display adapter 128 MB or greater, Microsoft® Direct3D®-capable workstation-class graphics card
  • 1,024 x 768 display resolution with true color
  • Internet Explorer 7.0 or later 
  • Install from download or DVD

Additional Requirements for 3D Modeling (All Configurations)

  • Intel Pentium 4 processor or AMD Athlon, 3 GHz or greater; or Intel or AMD dual-core processor, 2 GHz or greater
  • 2 GB RAM or more
  • 2 GB hard disk space available in addition to free space required for installation
  • 1,280 x 1,024 true color video display adapter 128 MB or greater, Pixel Shader 3.0 or greater, Microsoft® Direct3D®-capable workstation-class graphics card

Modify Object Properties by Layers

you learn to change the default and assigned properties of a
layer. You change the color, linetype, and lineweight of layers.
To change the linetype assigned to a layer
1 Ensure that the Layer Properties Manager is open. Click in the Linetype
column of the Green Gas layer.
2 In the Select Linetype dialog box, select a linetype from the listed options.
If the linetype you need is not listed, click Load.

3 Select the HOT_WATER_SUPPLY linetype and click OK.
The selected linetypes are loaded.

4 Select the HOT_WATER_SUPPLY linetype and click OK.
Objects on the layer are updated to the HOT_WATER_SUPPLY linetype.

You have learned to change the linetype for a layer.

To change the color assigned to a layer

1 Ensure that the Layer Properties Manager is open. Click in the Color
column of the Green Gas layer.

2 In the Select Color dialog box, the Index Color tab, select the Red color
swatch and click OK. The object in the layer is updated to red color.
Objects on the layer are updated to the color red.

You have learned to change the color for a layer.

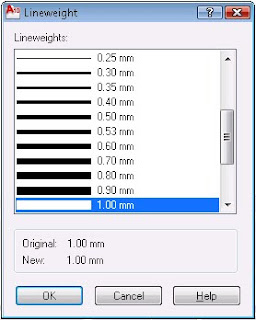
To change the lineweight of a layer

1 Ensure that the Layer Properties Manager is open. Click in the Lineweight
column of the Green Gas layer.
2 In the Lineweight dialog box, Lineweight list, select the lineweight 0.70
mm and click OK.
Objects on the layer are updated to the lineweight 0.70 mm.
You have learned to change the lineweight of a layer.

Saturday, April 10, 2010

Creat Basic 3D Object in Auto Cad 2010

This tutorial outlines the procedures for creating three-dimensional objects by creating basic
3D shapes known as solid primitives. You can also create 3D models by extruding 2D shapes.
Audience: Users new to 3D modeling with AutoCAD 2010
Prerequisites: Working knowledge of 2D drafting
Time to complete: 15 minutes
Objectives
■ Create 3D solid primitives
■ Create 3D objects from 2D objects


Create 3D Solid Primitives

In this lesson, you learn how to create 3D solid primitives in the 3D Modeling
workspace.
You can use standard 3D solid objects known as solid primitives to create a
box, cone, cylinder, sphere, torus, wedge, and pyramid. To create these 3D
solid primitives, switch the workspace to 3D Modeling, where the palettes
and ribbon panel are customized to create and modify 3D solid models.
Switch to the 3D Modeling Workspace
1 On the status bar, at the bottom of the drawing area, click the Workspace
Switching button.
2 On the Workspace menu, click 3D Modeling.

Get Started Auto Cad 2010

In this lesson, you learn how to start AutoCAD. You also learn about the basic
areas of the AutoCAD window.
To download tutorial file
1 Go to http://www.autodesk.com/autocad-tutorials.
2 Unzip getting_started_basics.zip to C:\My Documents\Tutorials.
To start AutoCAD
1 To open AutoCAD, click Start menu (Windows) ➤ (All) Programs ➤
Autodesk ➤ AutoCAD 2010 ➤ AutoCAD 2010 - English.
NOTE If the New Features dialog box appears, select Maybe later and OK
to close it.
The AutoCAD window opens with an empty drawing file named
Drawing1.dwg.
2 Before moving on to the next lesson, become familiar with the areas of
the AutoCAD window labeled below.

Use a Drawing Template

In this lesson, you learn how to start a drawing using a drawing template file.
When you use a template file, new drawings created from the template
automatically use the settings defined in the template. This saves you setup
time and helps to make sure each drawing you create follows your company’s
CAD standards.
Drawing template files have a .dwt file extension
Some of the settings stored in drawing template files include
■ Unit type and scale (precision)
■ Title blocks/borders, blocks, and logos
■ Layer names
■ Snap, grid, and ortho settings
■ Grid limits
■ Annotation styles
■ Linetypes
To start a drawing with a template
1 Click Start menu (Windows) ➤ (All) Programs ➤ Autodesk ➤ AutoCAD
2010 ➤ AutoCAD 2010 - English.
2 NOTE If the New Features dialog box appears, select Maybe later and OK
to close it.
The AutoCAD window opens with an empty drawing file Drawing1.dwg.
3 Click ➤ New.
4 In the Select Template dialog box, select Tutorial-iArch.dwt.

5 Click Open to open the Tutorial-iArch.dwt template.

Sunday, February 28, 2010

Auto Cad 2010 Quick Start to Stand-Alone Installation

Uninstall Auto Cad

When you uninstall AutoCAD, all components are removed. This means that
even if you've previously added or removed components, or if you've reinstalled
or repaired AutoCAD, the uninstall removes all AutoCAD installation files
from your system.
To uninstall AutoCAD
1 Do one of the following:
■ (Windows XP) Click Start menu ➤ Settings ➤ Control Panel ➤
Add or Remove Programs.
■ (Windows Vista) Click Start menu ➤ Control Panel ➤ Programs
and Features ➤ Uninstall or Change a Program.
2 Then, do one of the following:
■ (Windows XP) In the Add or Remove Programs window, select
AutoCAD, then click Change/Remove.
■ (Windows Vista) In the Uninstall or Change a Program window, select
AutoCAD, then click Uninstall/Change.
The AutoCAD Installation wizard re-opens in Maintenance mode.
3 Click Uninstall.
4 On the Uninstall page, click Next to remove AutoCAD from
the system.
5 When informed that the product has been successfully uninstalled, click
Finish.
NOTE Even though AutoCAD is removed from your system, the software license
remains. If you reinstall AutoCAD at some future time, you will not have to register
and re-activate the program.


Installing Design Review

Autodesk Design Review 2010 is not installed by default when you install
AutoCAD. It is recommended that Design Review be installed if you need to
view DWF or DWFx files.
NOTE If you use Windows Vista, you can view and print DWFx files without
installing Design Review.
Autodesk Design Review is a free program used for creating and reviewing
DWF or DWFx files. An open, published, and secure file format developed by
Autodesk, DWF enables you to combine and publish rich 2D- and 3D-design
data, and share it with others.
The following commands create DWF or DWFx files.
■ PUBLISH
■ PLOT
■ 3DDWF
■ PUBLISH TO WEB
■ EXPORT
■ AUTOPUBLISH
■ SSM 

Auto Cad 2010 Migrating and Customizing

If you have a previous version of AutoCAD installed on your system, you can install a newer
version of AutoCAD and keep other versions of the program on the same system. This is called
a side-by-side installation. If you've purchased an upgrade version of AutoCAD, you are required
to uninstall the previous version within 120 days of installing your newer product. See your
license agreement for more information.
In this section, you learn about migrating from previous releases, using customized files from
previous releases, and locating customized files.